Friday, January 31, 2020

Configuring Kheops with Keycloak

This post discusses how to install Kheops and Keycloak in 2 Centos 7 VMs.

First, install docker and docker-compose in both VMs.

You may also need to add the user to docker group

$ sudo usermod -aG docker $USER

and either log out and log in again (or restart, in case of a VM).

VM1:

Install Keycloak with Docker, together with a user account

First, create a fullchain.pem and privkey.pem from Letsencrypt.


Step 1: Keys!

Two options.

Option 1: Copy and rename the crt and key

$ cp keys-keycloak/fullchain.pem https/tls.crt

$ cp keys-keycloak/privkey.pem https/tls.key


Option 2: Create the crt and key with OpenSSL.

Alternatively, the crt and key can be created as below.

$ openssl x509 -outform der -in fullchain.pem -out tls.crt

$ openssl rsa -in privkey.pem -out tls.key

Move the tls.crt and tls.key to a separate folder (https) and cd to that directory.


Step 2. Set the permissions for the keys


$ cd https


$ chmod 700 .

$ chmod 600 tls.key

$ chmod 644 tls.crt


Step 3. Run the Keycloak container


$ docker run -d -p 443:8443 -e KEYCLOAK_USER=pradeeban -e KEYCLOAK_PASSWORD=password -v /home/pradeeban/https:/etc/x509/https --name kc jboss/keycloak

 
Keycloak will use port 443/https.

Now go to https://HOSTNAME

Log in with the user name and password you specified before.

Step 4. Now to configure a log in connect for Kheops

First create a new realm with the name, "demo".

1. Keycloak KHEOPS Login Client

Click the "Clients" tab, and choose the "Create" option.

Client ID = loginConnect

Click "Save", which will then open more configurations for the "LoginConnect" that you just created.

Turn on the option "Implicit Flow Enabled"

Turn off the "Direct Access Grants Enabled"

Valid Redirect URIs: https://KHEOPS-HOME/*

(for example: https://dbmi.virtualpacs.org/*)

Web origin: https://KHEOPS-HOME

(for example: https://dbmi.virtualpacs.org)


Click "Save" again.


2. Client Scope (kheops)

Click the "Client Scopes" tab, and choose the "Create" option.

Name: kheops

Turn off the "Display On Consent Screen"

Click "Save"


Click "Clients" again and go to "LoginConnect"

Go to the "Client Scopes" tab.

Choose "kheops" from the Available Client Scopes and choose the "Add selected" option. Remove all the other options from the Assigned Default Client Scopes as well as Assigned Default Client Scopes.

Add the email and full name token mappers to the kheops Client Scope by clicking on the Add Builtin button.

3. Service Account

Create another client "kheopsAuthorization".

Save, and then disable "Standard Flow Enabled" and "Direct Access Grants Enabled".

Change "Access Type" to "Confidential". and save.

Change "Service Accounts Enabled" to "On" and save.

The Service Account’s credentials (secret) can be found under the Credentials tab.

Choose the "KheopsAuthorization" Scope mappings. Under the "scope", disable "Full Scope Allowed" option. Choose "realm-management" as the "Client Roles", and add "view-users" option.

Now, repeat the above step for "Service Account".

The Service Account’s credentials (secret) can be found under the Credentials tab. Copy it to replace the default secret provided in kheopsDocker/kheops/secrets/kheops_keycloak_clientsecret, or provide it as the secret when prompted during the Kheops configuration.


4. Logging Impersonations

Under the "LoginConnect" client's Mappers tab, click "Add Bulletin", and add the Impersonator User ID."

Change the "Token Claim Name" to "act.sub". Then disable "Add to ID token" option.

Finally, click "Save". This is supposed to conclude the configurations unless I missed something.


Export your realm for later use from the host:

$ docker exec -it kc /opt/jboss/keycloak/bin/standalone.sh -Dkeycloak.migration.action=export -Dkeycloak.migration.provider=singleFile  -Djboss.http.port=8888 -Djboss.https.port=9999 -Djboss.management.http.port=7777 -Dkeycloak.migration.file=kkconf.json
 

Copy the file to the host machine, from the Docker container.

$ docker cp kc:/kkconf.json .

At the time of writing, Keycloak documentation had some issues that are fixed in the above command. 
 
Then next time, you can easily import this realm, rather than configuring everything from scratch:
 
$ docker run -e KEYCLOAK_USER=USERNAME -e KEYCLOAK_PASSWORD=PASSWORD \
    -e KEYCLOAK_IMPORT=/tmp/example-realm.json -v /tmp/example-realm.json:/tmp/example-realm.json jboss/keycloak 


Step 5: Configure Kheops

VM2:

Run Kheops with Docker


$ git clone https://github.com/OsiriX-Foundation/kheopsDocker.git

$ cd kheopsDocker

$ git checkout install-secure

$ sh kheopsinstall.sh            [See footnote at the end of this post].


Follow the prompts.

Enter the secret: Enter the secret copied from Keycloak in the previous step.

What is the Keycloak host ? (ex: https://keycloak.kheops.online) https://keycloak.virtualpacs.org

What is the Keycloak realm ? demo

What is your hostname ? (ex: demo.kheops.online) dbmi.virtualpacs.org


Add your public and private key in the directory kheops/secrets (fullchain1.pem / privkey1.pem)

$ cp keys-kheops/fullchain.pem kheopsDocker/kheops/secrets/fullchain1.pem

$ cp keys-kheops/privkey.pem kheopsDocker/kheops/secrets/privkey1.pem

Press enter to start KHEOPS

Now, access Kheops from https://dbmi.virtualpacs.org


To enable registrations of new users for Kheops, go to Realm Settings -> Login tab in your Keycloak instance and turn on User registration. If you do not want to allow anyone to create an account, you may instead click on Users -> Add user to manually create users.

Feb 19, 2020: As of today, there is a minor tweak needed for this to get working.

In the .env file, set:
KHEOPS_REVERSE_PROXY_IMAGE_TAG=v0.9.0-contentsecurity-fix
before running the kheopsinstall.sh.
Monday, January 27, 2020

Configuring Keycloak for Kheops


Please follow the next blog post on this topic instead. This post is outdated.


This post discusses how to install Kheops and Keycloak in Centos 8.

First, install docker and docker-compose.

You may also need to add the user to docker group

$ sudo usermod -aG docker $USER

and either log out and log in again (or restart, in case of a VM).


Install Keycloak with Docker, together with a user account

$ docker run -e KEYCLOAK_USER= -e KEYCLOAK_PASSWORD= jboss/keycloak
 

$ docker run -p 8081:8080 -p 9443:8443 -e KEYCLOAK_USER=pradeeban -e KEYCLOAK_PASSWORD=password jboss/keycloak

Now go to http://localhost:8081

Log in with the user name and password you specified before.

Now to configure a log in connect for Kheops


1. Keycloak KHEOPS Login Client

Click the "Clients" tab, and choose the "Create" option.

Client ID = loginConnect

Click "Save", which will then open more configurations for the "LoginConnect" that you just created.

Turn on the option "Implicit Flow Enabled"

Turn off the "Direct Access Grants Enabled"

Valid Redirect URIs: http://localhost:8081/*

Web origin: http://localhost:8081

Click "Save" again.


2. Client Scope (kheops)

Click the "Client Scopes" tab, and choose the "Create" option.

Name: kheops

Turn off the "Display On Consent Screen"

Click "Save"


Click "Clients" again and go to "LoginConnect"

Go to the "Client Scopes" tab.

Choose "kheops" from the Available Client Scopes and choose the "Add selected" option. Remove all the other options from the Assigned Default Client Scopes as well as Assigned Default Client Scopes.


Add the email and full name token mappers to the kheops Client Scope by clicking on the Add Builtin button.

3. Service Account

Create another client "kheopsAuthorization".

Save, and then disable "Standard Flow Enabled" and "Direct Access Grants Enabled".

Change "Access Type" to "Confidential". and save.

Change "Service Accounts Enabled" to "On" and save.

The Service Account’s credentials (secret) can be found under the Credentials tab.

Choose the "KheopsAuthorization" Scope mappings. Under the "scope", disable "Full Scope Allowed" option. Choose "master-realm" as the "Client Roles", and add "view-users" option.

Now, repeat the above step for "Service Account".

The Service Account’s credentials (secret) can be found under the Credentials tab. Copy it to replace the default secret provided in kheopsDocker/kheops/secrets/kheops_keycloak_clientsecret.


4. Logging Impersonations

Under the "LoginConnect" client's Mappers tab, click "Add Bulletin", and add the Impersonator User ID."

Change the "Token Claim Name" to "act.sub". Then disable "Add to ID token" option.

Finally, click "Save". This is supposed to conclude the configurations unless I missed something.


Run OHIF Viewer with Docker


$ docker run -p 3000:80 -p 3443:443 ohif/viewer:latest

Confirm that OHIF Viewer is running fine, by going to localhost:3000 in your browser.


Run Kheops with Docker


$ git clone git@github.com:OsiriX-Foundation/kheopsDocker.git

$ cd kheopsDocker/kheops

Change the property values of docker-compose.env as shown below.


KHEOPS_KEYCLOAK_CLIENTID=kheopsAuthorization

KHEOPS_KEYCLOAK_URI=https://localhost:9443

KHEOPS_KEYCLOAK_REALMS=demo


KHEOPS_VIEWER_URL=http://localhost:3000

Save and exit.

Start the Kheops containers.

$ cd ..

$ sh script_run_docker.sh

Now go to http://localhost:8042 from your favorite browser to access Kheops.

 $ docker ps
CONTAINER ID        IMAGE                                              COMMAND                  CREATED             STATUS              PORTS                                                                                                                                              NAMES
c340d0e1f214        osirixfoundation/kheops-reverse-proxy:ci-test      "./etc/nginx/conf.d/…"   About an hour ago   Up About an hour    0.0.0.0:80->80/tcp, 0.0.0.0:443->443/tcp, 0.0.0.0:8042->8042/tcp, 0.0.0.0:8048->8048/tcp                                                           kheopsreverseproxy
0f9a44db1bfb        osirixfoundation/kheops-dicomweb-proxy:master      "./replaceSecretsAnd…"   About an hour ago   Up About an hour    0.0.0.0:8049->8080/tcp                                                                                                                             kheopsdicomwebproxy
0416a8badd18        osirixfoundation/kheops-ui:master                  "./docker-entrypoint…"   About an hour ago   Up About an hour    80/tcp, 3000/tcp                                                                                                                                   kheopsui
38a3b77ca2a2        osirixfoundation/kheops-authorization:dev          "./replaceSecretsAnd…"   About an hour ago   Up About an hour    8080/tcp                                                                                                                                           kheopsauthorization
2e2f7e7282bd        osirixfoundation/kheops-zipper:master              "./replaceSecretsAnd…"   About an hour ago   Up About an hour    8080/tcp                                                                                                                                           kheopszipper
3908f545ff49        osirixfoundation/pacs-authorization-proxy:master   "/bin/sh -c '. $NGIN…"   About an hour ago   Up About an hour    0.0.0.0:82->80/tcp                                                                                                                                 pacsauthorizationproxy
88cf4203c434        osirixfoundation/kheops-dcm4chee-arc-psql:latest   "/script_entrypoint.…"   About an hour ago   Up About an hour    0.0.0.0:2575->2575/tcp, 0.0.0.0:8080->8080/tcp, 0.0.0.0:8443->8443/tcp, 0.0.0.0:8787->8787/tcp, 0.0.0.0:9990->9990/tcp, 0.0.0.0:11112->11112/tcp   pacsarc
b4147f1c4244        osirixfoundation/kheops-database:demo              "verify-secret-env-v…"   About an hour ago   Up About an hour    5432/tcp                                                                                                                                           db
7edb16bc1868        dcm4che/slapd-dcm4chee:2.4.44-15.0                 "/docker-entrypoint.…"   About an hour ago   Up About an hour    389/tcp                                                                                                                                            pacsldap
d5290c892e16        jboss/keycloak                                     "/opt/jboss/tools/do…"   About an hour ago   Up About an hour    0.0.0.0:9443 -> 8443/tcp, 0.0.0.0:8081->8080/tcp                                                                                                                   jovial_varahamihira
279bf6a09ce0        ohif/viewer:latest                                 "/usr/src/entrypoint…"   About an hour ago   Up About an hour    0.0.0.0:3000->80/tcp, 0.0.0.0:3443->443/tcp                                                                                                        dreamy_hawking

Friday, January 24, 2020

Quickly view your DICOM files locally

Install Kheops and OHIF Viewer with Docker
$ docker run -p 3000:80 ohif/viewer:latest
  
Now, OHIF Viewer can be accessed from http://localhost:3000 and Kheops from http://localhost:8042/

Load any Dicom files to your Kheops and click the "Open OHIF"

It will take you to a long URL of the hosted OHIF Viewer online. Most likely this won't work.

https://ohif.kheops.online/viewer/?url=http%3A%2F%2Flocalhost%3A8042%2Fapi%2Flink. ....

In the above URL, replace https://ohif.kheops.online/ with http://localhost:3000 as in

http://localhost:3000/viewer/?url=http%3A%2F%2Flocalhost%3A8042%2Fapi%2Flink. ....

Now you see the DICOM images in your own OHIF Viewer deployment.

Tuesday, January 21, 2020

Setting up Kheops - the docker projects

Kheops deployment consists of several Docker projects. This post lists them, adopted from the CI docker-compose.

UI 
1) kheops-ui:
    image: osirixfoundation/kheops-ui:${KHEOPS_UI_IMAGE_TAG}
    https://github.com/OsiriX-Foundation/KheopsUI

Reverse Proxy
2) kheops-reverse-proxy:
    image: osirixfoundation/kheops-reverse-proxy:${KHEOPS_REVERSE_PROXY_IMAGE_TAG}

Authorization
3) kheops-database (postgresql):
    image: osirixfoundation/kheops-database:${KHEOPS_DATABASE_IMAGE_TAG}
    https://github.com/OsiriX-Foundation/KheopsDatabase

4) kheops-authorization:
    image: osirixfoundation/kheops-authorization:${KHEOPS_AUTHORIZATION_IMAGE_TAG}

5) kheops-dicomweb-proxy:
    image: osirixfoundation/kheops-dicomweb-proxy:${KHEOPS_DICOMWEB_PROXY_IMAGE_TAG}

Zipper
6) kheops-zipper:
    image: osirixfoundation/kheops-zipper:${KHEOPS_ZIPPER_IMAGE_TAG}

Authorization Proxy
7) pacs-authorization-proxy:
    image: osirixfoundation/pacs-authorization-proxy:${PACS_AUTHORIZATION_PROXY_IMAGE_TAG}


DCM4CHEE PACS
8) ldap: LDAP Server initalized for the DICOM Archive
    image: dcm4che/slapd-dcm4chee:${PACS_LDAP_IMAGE_TAG}

DCM4CHEE LDAP also internally uses its own Postgresql database.

9) archive:
    image: osirixfoundation/kheops-dcm4chee-arc-psql:${KHEOPS_ARC_IMAGE_TAG}

In addition to these 9 docker containers, Keycloak runs in another VM and communicate with these containers.

We need to fit the dockers in an appropriate number of VMs.

A conservative approach would be, 2 VMs.
1 with Keycloak and everything else with the Docker containers on the 2nd.

I think the Kheops proposed approach would be 7 VMs.
1. Keycloak
2. Kheops UI
3. Kheops Authorization
4. Reverse Proxy
5. Zipper
6. Authorization Proxy
7. DCM4Chee PACS

But maybe, Kheops UI and Kheops Authorization can be merged into a single Kheops VM. In that case, we can also move zipper into that Kheops VM. Probably Authorization Proxy should just live with dcm4chee PACS.

Then we have 4 VMs:
1. Keycloak
2. Kheops containers (kheops-ui, kheops-database, kheops-authorization, kheops-dicomweb-proxy, and kheops-zipper)
3. Reverse Proxy container (kheops-reverse-proxy)
4. DCM4Chee containers (slapd-dcm4chee, kheops-dcm4chee-arc-psql, and pacs-authorization-proxy)

I think the 4 VM route is decent.

Panamá: Self-discovery in a solo trip..

View from my room
I had a long weekend for MLK day. I decided to pay a quick visit to Panamá since it gives visa-free entry for those who have a USA visa (conditions apply). There is also a direct flight from Atlanta to Panamá city with Delta, which was good. The flight goes direct south, from Atlanta, flying above the beautiful Carribean sea.

I already checked the surroundings of the airport before my trip. When I arrived, everything looked familiar. I had my lunch at the small cafe-restaurant named "Chicken port restaurant" near the Panamá Tocumen airport.

While there is public transport, getting the public transport card from the airport seemed impossible. I decided to go with Uber. As a pleasant surprise, the Uber drivers were very friendly and helpful. I did not get a SIM card. I used the Airport wifi to order the Uber. After that, wherever I went, I just connected to the destination's Wifi to call Uber. Interestingly, almost all the tourist sites in the city had a decent public Internet.

I stayed in Radisson Hotel Panama Canal. My room had a lovely view of the Panama Canal, which looked great during the sunrise, sunset, and every other time. I visited the Miraflores Locks: Centro de Visitantes de Miraflores the morning, and then Biomuseu. I saved some money by buying the combination ticket for the Miraflores Locks and Biomuseu.

From the Biomuseu, I walked to Centro Natural Punta Culebra, where I saw a slowly moving sloth on a tree and an iguana couple having sex on the tree (the female iguana fell from the top of the tree, by the end of the act). I also saw an anteater minding its business in the bush. Then I walked to the Balboa neighborhood. It was very sunny and hot. But the walk near the bay was lovely. I had a late lunch: Prawns in passion fruit sauce in Bucaneros restaurant in Flamenco island.

The trip felt like a self-discovery. I also felt very welcomed, and it became my most favorite trip after Portugal/2012. Of course, thanks to the wonderful people of Panamá. Hopefully, I will be back in the future.

Monday, January 20, 2020

The Birkman Method

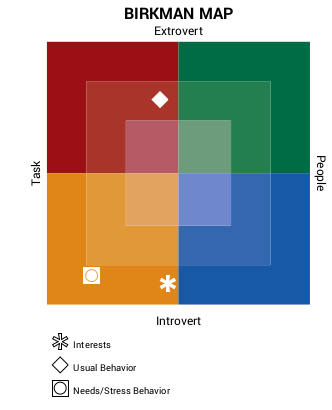
We recently had a Birkman session at the university. This is the summary map I got. So I am usually an extrovert - which I think is correct.

Image
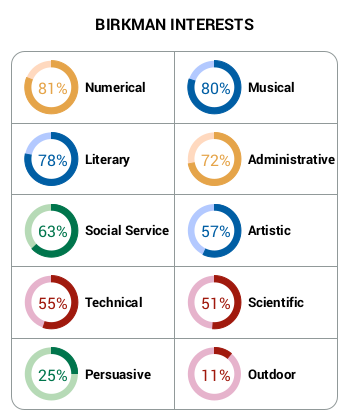
 The detailed components go like this.
Image

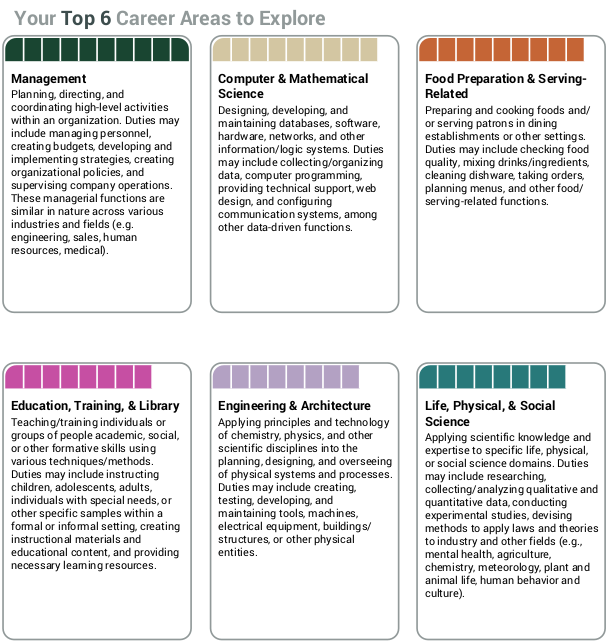
Then my interests are as below.

Image
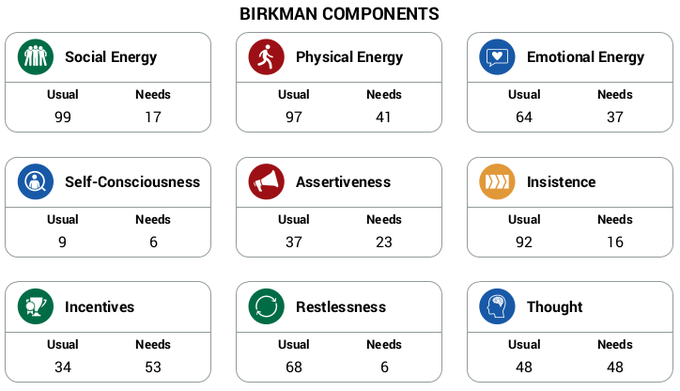
 Finally, my top career areas to explore:

Image

That's it folks. Birkman uncle told me I should manage a Sri Lanka restaurant. lol. Restaurante Sri Lanka em Parque das Nações (Ano 2048) 😇

Friday, January 10, 2020

Stop the small talk if you need information

I hate small talk online and offline - especially when it doesn't go anywhere and performs zero information exchange despite consuming considerable time. This post talks about why I hate small talk online.

They: Hi
Me: Hi
They: How r u?
Me: Good, thanks, and you?
They: Good too. 

So what's next? Do I need to continue this chat? Note how I was the one who typed more characters above despite them starting the convo. Come to the point directly! I am not here to lead and drive the communication that you started (unless we are close and we know each other very well). If you are chatting online with me through LinkedIn, very likely there is a reason. You don't message someone without a purpose, especially a stranger -- that too using professional network platforms such as LinkedIn.

These days, if the message comes from an unknown youth, I cut them short to help both of us. 

They: Hi 
Me: Hi 
They: How r u? 
Me: Anything I can help with? 
They: I want to apply to GSoC. How to proceed? 

See, I have prevented that unnecessary bluff and waste of network bandwidth.

My suggestion to the youngsters, don't ask to ask. Just ask. If someone has responded to your chat/message, you have already achieved their attention. Most people have a little attention span. Don't lose that to small talk. Instead, come to the point instantly. Although chats are synchronous technically, they work more asynchronously in practice. I am not glued to my computer to slowly receive each piece of message and reply. But if you message the important/core communication at once in brief, it can get you the answer faster.

Often the below communication works better. Shorter and more to the point, but more complete than the previous 2.

They: Hi Pradeeban, I want to apply to GSoC with Emory BMI. How to proceed?
Me: Hi, Thanks for your interest. Please check https://github.com/sharmalab/Emory-BMI-GSoC

All it needed was just one single message exchange. Not three or more as in the second and first cases.