Dec 11th, 2019: Today I presented my first conference paper from my Postdoc at IEEE big data 2019 conference held in Big Data 2019. It was fun listening to various talks and networking with several researchers from all across the world.
Abstract: The diversity of data management systems affords developers the luxury of building heterogeneous architectures to address the unique needs of big data. It allows one to mix-n-match systems that can store, query, update, and process data based on specific use cases. However, this heterogeneity brings with it the burden of developing custom interfaces for each data management system. Existing big data frameworks fall short in mitigating these challenges imposed. In this paper, we present Bindaas, a secure and extensible big data middleware that offers uniform access to diverse data sources. By providing a RESTful web service interface to the data sources, Bindaas exposes query, update, store, and delete functionality of the data sources as data service APIs, while providing turn-key support for standard operations involving access control and audit-trails. The research community has deployed Bindaas in various production environments in healthcare. Our evaluations highlight the efficiency of Bindaas in serving concurrent requests to data source instances with minimal overheads.
Confluence allows its HTML pages to be exported in a single zip. There is a Confluence-to-Github-Markdown toolthat allows automatic export of these HTML files to markdown .md files with a single command from the core directory:
$ confluence-to-github-markdown
Now you can create separate pages in the GitHub wiki with these md files. However, there are a certain limitations that need to be manually handled to complete the process.
1. Image. GitHub wiki does not support uploading images. Images are posted via URLs in the wiki. Therefore, currently we need to upload the images to a public location and access the URL from there.
2. Metadata. The tool also converts metadata (which is actually good I think) to md. We need to manually remove them wherever unnecessary instead of showing them as plain text in the GitHub wiki.
3. The converter tool creates the name of the md file from the html title. If you have ' or any special characters in the title of your html, it will fail to convert and throw js errors. To fix, change the title header from something such as "Rakshak’s RESTful API" to "Rakshak RESTful API" before executing the converter tool.
4. Internal links (links to named anchors in the markdown) are not handled by the converter. The anchors must be manually added.
5. Links to other pages in the confluence wiki are preserved as it is, rather than having them as a relative link. Therefore they need to be replaced by the respective new link in the markdown wiki.
6. Video embedding is not supported in Markdown. Therefore, the converter tool simply ignores any video files embedded in the HTML. To fix this, in the final wiki pages, manually add the videos as a simple HTML links as in, [screencast](https://www.youtube.com/embed/S8juo0Dx68I).
Given below is a detailed transcript of what is executed in the above screencast on checking out, building, running, and developing Bindaas with Git, Maven, and IntelliJ IDEA.
Skip the step 1 below and go directly to step 2 if you do not have access to the source code of Bindaas. If you have access to the source code of Bindaas, follow step 1, followed by step 2.
Step 1: Building Emory Bindaas
Alternatively, you may choose to build Bindaas from source. I would recommend using the maven-restructure branch (or maven-restructure-dev branch, if you would like to be in the bleeding edge, though most branches are periodically synced) for that, as it consists of fixes and enhancements to Maven integration. Hence this branch enables easy integration with multiple IDEs such as IntelliJ IDEA, Eclipse, and all the Java IDEs that have Maven integration, where currently master branch supports only Eclipse IDE.
Create Project in Bindaas
Bindaas has been tested with Oracle Java 1.8.x.
Clone the source code.
$ git clone git@github.com:sharmalab/bindaas.git
$ cd bindaas
$ git checkout dev
$ mvn clean install
$ cd dist
Step 2: Running Emory Bindaas
Change to the bin directory of Bindaas distribution (either that is downloaded as binary, or that is built from the source following step 1),
$ cd bin
You may run Bindaas using one of the 3 options below: Option 1
$ ./startup.sh
This starts Bindaas using nohup. Logs could be found at log/bindaas.log. You may stop the program later by running the shutdown.sh script.
Option 2
If you rather like to have the logs in the foreground in the terminal itself, instead of using the start up script, you may run the java command directly.
$ java -Dpid=BINDAAS_INSTANCE -Xmx1024m -jar org.eclipse.osgi_3.8.2.v20130124-134944.jar Option 3
Alternatively, start with -console flag to have OSGi console:
$ java -Dpid=BINDAAS_INSTANCE -Xmx1024m -jar org.eclipse.osgi_3.8.2.v20130124-134944.jar -console
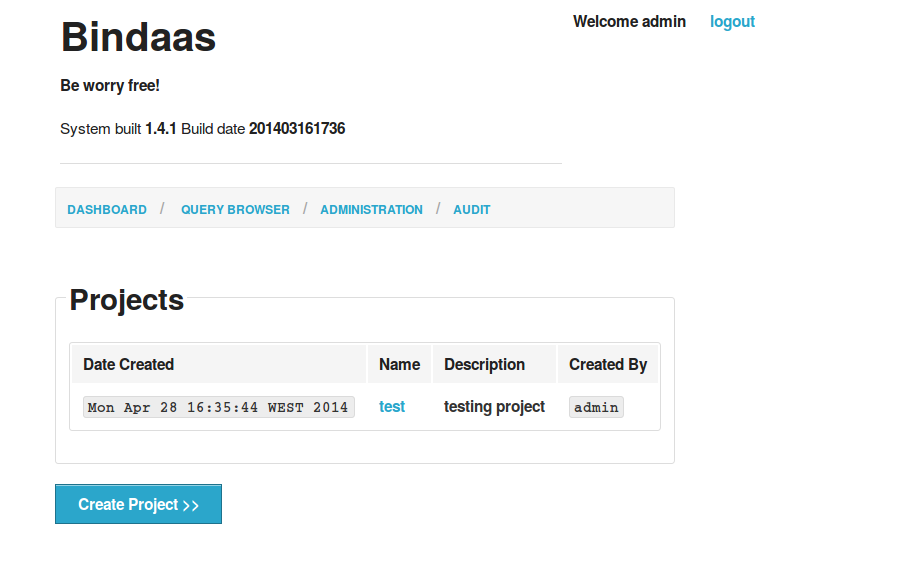
Now you have started Bindaas using one of the above 3 options, you may connect to the dashboard at http://localhost:8080/dashboard/ using the user name and password, "admin", "password".
Make sure to have the trailing "/" at the end of URL as shown above.
Once you have created a project using the "Create Project" command, you may define the data providers for the project at http://localhost:8080/dashboard/workspace/{project_name}
You may choose a database such as a mysql or Mongodb databases, or use an HTTP provider.
Once the data provider is defined, queries could be created from the respective listing page of the data provider,
Created queries could be viewed from http://localhost:8080/dashboard/{project_name}/{data_provider_name}/query/{query_name}
"Try Me" option could be used to view the outputs of the query.
This is a very simple post on starting to use Bindaas. You may read further on creating a new data service using Bindaas here, or go through the wiki pages.
Developing Bindaas
First you need to download the entire source tree and build using Maven as in step 1. You may develop using any Java IDE that has Maven integration, including IntelliJ IDEA and Eclipse. I highly recommend IntelliJ IDEA. Just open the pom.xml of the root directory of bindaas source cloned from git to open the entire source hierarchy.
Happy coding!
P.S: The above build was tested with Maven 3.5.0 and Oracle Java version "1.8.0_121".
$ java -version
java version "1.8.0_121"
Java(TM) SE Runtime Environment (build 1.8.0_121-b13)
Java HotSpot(TM) 64-Bit Server VM (build 25.121-b13, mixed mode)
Starting Bindaas with Option 3 above is most preferred for development and debugging purposes, as you can debug into the OSGi console. For example, you may list the installed feature using the below command. osgi>ss
"Framework is launched."
id State Bundle
0 ACTIVE org.eclipse.osgi_3.8.2.v20130124-134944
1 ACTIVE com.google.gson_2.1.0.v201203072145
2 ACTIVE org.eclipse.equinox.console_1.0.100.v20121001-124408
3 ACTIVE org.apache.felix.gogo.shell_0.10.0.v201211091412
4 ACTIVE org.apache.felix.gogo.runtime_0.10.0.v201209301036
5 ACTIVE org.apache.felix.gogo.command_0.10.0.v201209301215
6 ACTIVE org.apache.felix.configadmin_1.6.0
7 ACTIVE org.springframework.osgi.log4j.osgi_1.2.15.SNAPSHOT
Fragments=46
8 ACTIVE org.apache.felix.eventadmin_1.3.2
9 ACTIVE org.apache.felix.fileinstall_3.2.6
11 ACTIVE org.springframework.core_3.2.2.RELEASE
10 ACTIVE http-datasource-provider_1.0.0
12 ACTIVE org.apache.felix.http.jetty_2.2.0
13 ACTIVE postgres-datasource-provider_1.0.1
14 ACTIVE bindaas-trusted-application-manager_1.0.0
15 ACTIVE org.eclipse.gemini.blueprint.core_1.0.2.RELEASE
16 ACTIVE bindaas-security-api_1.0.0
17 ACTIVE org.eclipse.orbit.mongodb_2.7.3.v20120213-1927
19 ACTIVE org.apache.felix.http.whiteboard_2.2.0
20 ACTIVE com.springsource.org.apache.commons.logging_1.1.1
21 ACTIVE org.springframework.aop_3.2.2.RELEASE
22 ACTIVE org.springframework.beans_3.2.2.RELEASE
23 ACTIVE org.eclipse.gemini.blueprint.extender_1.0.2.RELEASE
24 ACTIVE org.springframework.context.support_3.2.2.RELEASE
25 ACTIVE db2jcc4-9.7_0.0.0
26 ACTIVE com.springsource.org.aopalliance_1.0.0
27 ACTIVE org.eclipse.gemini.blueprint.io_1.0.2.RELEASE
28 ACTIVE com.springsource.edu.emory.mathcs.backport_3.1.0
29 ACTIVE org.springframework.expression_3.2.2.RELEASE
30 ACTIVE org.springframework.context_3.2.2.RELEASE
18 ACTIVE bindaas-commons-cxf-wrapper_1.0.0
31 ACTIVE mysql-datasource-provider_1.0.1
32 ACTIVE mongodb-datasource-provider_1.0.0
33 ACTIVE security-dashboard_1.0.0
34 ACTIVE bindaas-commons-openid-helper_1.0.0
35 ACTIVE bindaas-commons-mail_1.0.0
36 ACTIVE bindaas-psuedo-sts_1.0.0
37 ACTIVE ldap-bindaas-authentication-provider_1.0.0
38 ACTIVE bindaas-web-console_1.0.0
39 ACTIVE drill-datasource-provider_1.0.1
40 ACTIVE db2-datasource-provider_1.0.0
41 ACTIVE bindaas-commons-h2-hibernate_1.0.0
42 ACTIVE bindaas-core-api_1.0.0
43 ACTIVE bindaas-core-impl_1.0.0
44 ACTIVE bindaas-version-manager_1.0.0
45 ACTIVE generic-sql-datasource-provider_1.0.0
46 RESOLVED log4j.config_1.0.0
Master=7
Note: The screencasts may be outdated as they were taken a few months ago. In case of mismatch between the screencast and the script/text in this blog post, follow the text.
Apache Drill has been integrated to Emory BMI's Bindaas Data Server, as a data source provider. The screencast below shows the basic usage of the Drill provider. Please note that the Drill provider is currently experimental and only available in the maven-restructure and maven-restructure-dev branches.
While maven-restructure remains a stable branch following a major restructuring on Bindaas to enhance its usability by the developers, maven-restructure-dev is a branch that is built on top of maven-restructure-dev. Mostly these branches are synced with minor latter developments may only be available at maven-restructure-dev till the merge.
These latter developments will be merged to the master branch eventually. The released versions of Bindaas can be found here.
If your Drill is configured with JPam for authentication, the user of the operating system also functions as the Drill user, as defined in the configurations of your Drill instance.
As Drill driver is based on the JDBC driver, the Drill JDBC url has a similar form. However, user name and password are optional for Drill Provider. If your Drill instance is not configured with JPam, leave the username and password entries blank when you define the data source in the Data Provider Creation step shown in the above screencast.
An example would be,
jdbc:drill:drillbit=localhost:31010 for a Drill configured stand-alone.
P.S: This screencast was captured using gtk-recordmydesktop. It works well on my Ubuntu-16.04. I highly recommend it for your screencasts.
Yagheli da?
I am Pradeeban, an Assistant Professor of Computer Science at the University of Alaska Anchorage. My research focuses on networking and big data innovations for healthcare and Circumpolar North.
Before moving to Alaska, as a Postdoctoral Researcher at the Department of Biomedical Informatics, Emory University, Atlanta, GA, USA. I researched and built efficient frameworks to schedule and execute biomedical informatics workflows.
I have an EU Erasmus Mundus Joint Doctorate in Distributed Computing (EMJD-DC) from INESC-ID Lisboa / Instituto Superior Técnico, Universidade de Lisboa, Portugal and Université catholique de Louvain, Belgium. I received my MSc degree, Erasmus Mundus European Master in Distributed Computing (EMDC), from Instituto Superior Técnico, Portugal, and KTH Royal Institute of Technology, Sweden.