Bindaas is a data services middleware platform built utilizing the componentized architecture of OSGi. Bindaas binary could be downloaded or built from source. To test Bindaas quickly, download the binary and extract it.
Given below is a detailed transcript of what is executed in the above screencast on checking out, building, running, and developing Bindaas with Git, Maven, and IntelliJ IDEA.
Skip the step 1 below and go directly to step 2 if you do not have access to the source code of Bindaas. If you have access to the source code of Bindaas, follow step 1, followed by step 2.
Step 1: Building Emory Bindaas
Alternatively, you may choose to build Bindaas from source. I would recommend using the maven-restructure branch (or maven-restructure-dev branch, if you would like to be in the bleeding edge, though most branches are periodically synced) for that, as it consists of fixes and enhancements to Maven integration. Hence this branch enables easy integration with multiple IDEs such as IntelliJ IDEA, Eclipse, and all the Java IDEs that have Maven integration, where currently master branch supports only Eclipse IDE.
Bindaas has been tested with Oracle Java 1.8.x.
Clone the source code.
Given below is a detailed transcript of what is executed in the above screencast on checking out, building, running, and developing Bindaas with Git, Maven, and IntelliJ IDEA.
Skip the step 1 below and go directly to step 2 if you do not have access to the source code of Bindaas. If you have access to the source code of Bindaas, follow step 1, followed by step 2.
Step 1: Building Emory Bindaas
Alternatively, you may choose to build Bindaas from source. I would recommend using the maven-restructure branch (or maven-restructure-dev branch, if you would like to be in the bleeding edge, though most branches are periodically synced) for that, as it consists of fixes and enhancements to Maven integration. Hence this branch enables easy integration with multiple IDEs such as IntelliJ IDEA, Eclipse, and all the Java IDEs that have Maven integration, where currently master branch supports only Eclipse IDE.
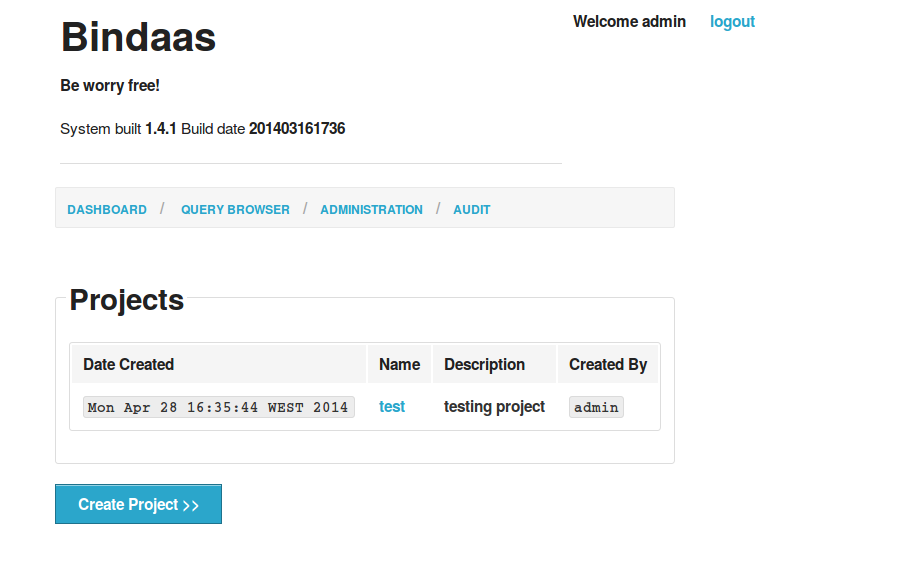 | |||||
| Create Project in Bindaas |
Bindaas has been tested with Oracle Java 1.8.x.
Clone the source code.
$ git clone git@github.com:sharmalab/bindaas.git
$ cd bindaas
$ git checkout dev
$ mvn clean install
$ cd dist
Step 2: Running Emory Bindaas
$ cd bindaas
$ git checkout dev
$ mvn clean install
$ cd dist
Step 2: Running Emory Bindaas
Change to the bin directory of Bindaas distribution (either that is downloaded as binary, or that is built from the source following step 1),
$ cd bin
You may run Bindaas using one of the 3 options below:
Option 1
You may run Bindaas using one of the 3 options below:
Option 1
$ ./startup.sh
This starts Bindaas using nohup. Logs could be found at log/bindaas.log. You may stop the program later by running the shutdown.sh script.
Option 2
If you rather like to have the logs in the foreground in the terminal itself, instead of using the start up script, you may run the java command directly.
$ java -Dpid=BINDAAS_INSTANCE -Xmx1024m -jar org.eclipse.osgi_3.8.2.v20130124-134944.jar
Option 3
Alternatively, start with -console flag to have OSGi console:
$ java -Dpid=BINDAAS_INSTANCE -Xmx1024m -jar org.eclipse.osgi_3.8.2.v20130124-134944.jar -console
Now you have started Bindaas using one of the above 3 options, you may connect to the dashboard at http://localhost:8080/dashboard/ using the user name and password, "admin", "password".
Make sure to have the trailing "/" at the end of URL as shown above.
Once you have created a project using the "Create Project" command, you may define the data providers for the project at http://localhost:8080/dashboard/workspace/{project_name}
You may choose a database such as a mysql or Mongodb databases, or use an HTTP provider.
Once the data provider is defined, queries could be created from the respective listing page of the data provider,
http://localhost:8080/dashboard/{project_name}/{data_provider_name}/createQueryEndpoint.action
The query could be a simple sql query such as,
select * from states
 |
| "Try Me" on a simple mysql data provider. |
Created queries could be viewed from http://localhost:8080/dashboard/{project_name}/{data_provider_name}/query/{query_name}
"Try Me" option could be used to view the outputs of the query.
This is a very simple post on starting to use Bindaas. You may read further on creating a new data service using Bindaas here, or go through the wiki pages.
Developing Bindaas
First you need to download the entire source tree and build using Maven as in step 1. You may develop using any Java IDE that has Maven integration, including IntelliJ IDEA and Eclipse. I highly recommend IntelliJ IDEA. Just open the pom.xml of the root directory of bindaas source cloned from git to open the entire source hierarchy.
Happy coding!
P.S: The above build was tested with Maven 3.5.0 and Oracle Java version "1.8.0_121".
$ mvn -v
Apache Maven 3.5.0 (ff8f5e7444045639af65f6095c62210b5713f426; 2017-04-03T21:39:06+02:00)
Maven home: /home/pradeeban/programs/apache-maven-3.5.0
Java version: 1.8.0_121, vendor: Oracle Corporation
Java home: /home/pradeeban/programs/jdk1.8.0_121/jre
Default locale: en_US, platform encoding: UTF-8
OS name: "linux", version: "4.8.0-58-generic", arch: "amd64", family: "unix"
$ java -version
java version "1.8.0_121"
Java(TM) SE Runtime Environment (build 1.8.0_121-b13)
Java HotSpot(TM) 64-Bit Server VM (build 25.121-b13, mixed mode)
Starting Bindaas with Option 3 above is most preferred for development and debugging purposes, as you can debug into the OSGi console. For example, you may list the installed feature using the below command.
osgi>ss
"Framework is launched."
id State Bundle
0 ACTIVE org.eclipse.osgi_3.8.2.v20130124-134944
1 ACTIVE com.google.gson_2.1.0.v201203072145
2 ACTIVE org.eclipse.equinox.console_1.0.100.v20121001-124408
3 ACTIVE org.apache.felix.gogo.shell_0.10.0.v201211091412
4 ACTIVE org.apache.felix.gogo.runtime_0.10.0.v201209301036
5 ACTIVE org.apache.felix.gogo.command_0.10.0.v201209301215
6 ACTIVE org.apache.felix.configadmin_1.6.0
7 ACTIVE org.springframework.osgi.log4j.osgi_1.2.15.SNAPSHOT
Fragments=46
8 ACTIVE org.apache.felix.eventadmin_1.3.2
9 ACTIVE org.apache.felix.fileinstall_3.2.6
11 ACTIVE org.springframework.core_3.2.2.RELEASE
10 ACTIVE http-datasource-provider_1.0.0
12 ACTIVE org.apache.felix.http.jetty_2.2.0
13 ACTIVE postgres-datasource-provider_1.0.1
14 ACTIVE bindaas-trusted-application-manager_1.0.0
15 ACTIVE org.eclipse.gemini.blueprint.core_1.0.2.RELEASE
16 ACTIVE bindaas-security-api_1.0.0
17 ACTIVE org.eclipse.orbit.mongodb_2.7.3.v20120213-1927
19 ACTIVE org.apache.felix.http.whiteboard_2.2.0
20 ACTIVE com.springsource.org.apache.commons.logging_1.1.1
21 ACTIVE org.springframework.aop_3.2.2.RELEASE
22 ACTIVE org.springframework.beans_3.2.2.RELEASE
23 ACTIVE org.eclipse.gemini.blueprint.extender_1.0.2.RELEASE
24 ACTIVE org.springframework.context.support_3.2.2.RELEASE
25 ACTIVE db2jcc4-9.7_0.0.0
26 ACTIVE com.springsource.org.aopalliance_1.0.0
27 ACTIVE org.eclipse.gemini.blueprint.io_1.0.2.RELEASE
28 ACTIVE com.springsource.edu.emory.mathcs.backport_3.1.0
29 ACTIVE org.springframework.expression_3.2.2.RELEASE
30 ACTIVE org.springframework.context_3.2.2.RELEASE
18 ACTIVE bindaas-commons-cxf-wrapper_1.0.0
31 ACTIVE mysql-datasource-provider_1.0.1
32 ACTIVE mongodb-datasource-provider_1.0.0
33 ACTIVE security-dashboard_1.0.0
34 ACTIVE bindaas-commons-openid-helper_1.0.0
35 ACTIVE bindaas-commons-mail_1.0.0
36 ACTIVE bindaas-psuedo-sts_1.0.0
37 ACTIVE ldap-bindaas-authentication-provider_1.0.0
38 ACTIVE bindaas-web-console_1.0.0
39 ACTIVE drill-datasource-provider_1.0.1
40 ACTIVE db2-datasource-provider_1.0.0
41 ACTIVE bindaas-commons-h2-hibernate_1.0.0
42 ACTIVE bindaas-core-api_1.0.0
43 ACTIVE bindaas-core-impl_1.0.0
44 ACTIVE bindaas-version-manager_1.0.0
45 ACTIVE generic-sql-datasource-provider_1.0.0
46 RESOLVED log4j.config_1.0.0
Master=7
Note: The screencasts may be outdated as they were taken a few months ago. In case of mismatch between the screencast and the script/text in this blog post, follow the text.


